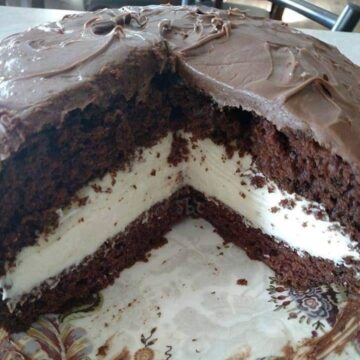
If you love the classic flavor of HoHos, you’re going to adore this HoHo Cake! With layers of moist chocolate cake, a creamy filling, and a rich chocolate frosting, this cake tastes just like the beloved snack, but even better! Perfect for birthdays, holidays, or whenever you’re in the mood for a decadent dessert, this cake is easy to make with a boxed cake mix and a few simple ingredients. Get ready for a nostalgic treat that’s sure to impress!

Why You’ll Love This Recipe
This recipe is a hit because it’s incredibly easy to make and has that irresistible combination of chocolate and cream filling. The light, fluffy filling contrasts beautifully with the rich chocolate cake and frosting, creating a dessert that’s both indulgent and satisfying. It’s a great make-ahead treat, as the flavors meld together even more as the cake chills. Whether for family gatherings or special celebrations, this HoHo Cake will be the star of the dessert table!
The Recipe
Ingredients:
For the Cake:
- 1 box chocolate cake mix (prepared according to package directions)
- 1 can milk chocolate frosting
For the Filling:
- 8 ounces cream cheese, softened
- ½ cup unsalted butter (1 stick), softened
- 3 cups confectioners' sugar
- 8 ounces whipped topping (like Cool Whip)
Step-by-Step Instructions:
- Bake the cake: Prepare the chocolate cake mix according to the package instructions. Pour the batter into two 9-inch round cake pans and bake as directed. Let the cakes cool completely before assembling.
- Make the filling: In a large mixing bowl, beat the softened cream cheese and butter together until smooth and creamy. Gradually add the confectioners' sugar, mixing until well combined. Fold in the whipped topping until the filling is light and fluffy.
- Assemble the cake: Place one cake layer on a serving plate. Spread a generous amount of the filling over the top. Place the second cake layer on top, gently pressing it down.
- Frost the cake: Spread the milk chocolate frosting evenly over the top and sides of the cake, covering it completely.
- Chill the cake: For best results, refrigerate the cake for at least 2 hours to allow the flavors to meld and the filling to set.
- Serve and enjoy: Slice and serve this HoHo-inspired cake chilled or at room temperature!
Serving and Storage Tips
- Serving: Serve this cake chilled or allow it to sit at room temperature for 15 minutes before slicing for easier serving. It’s delicious with a scoop of vanilla ice cream or a drizzle of chocolate sauce.
- Storage: Store leftovers in an airtight container in the refrigerator for up to 5 days. For longer storage, wrap slices tightly in plastic wrap and freeze for up to 2 months.
Helpful Notes
- Make sure the cake layers are completely cool before adding the filling to prevent it from melting.
- For a more indulgent twist, add a drizzle of caramel or chocolate sauce between the cake layers.
- If you prefer a firmer filling, chill it for 30 minutes before spreading it on the cake.
FAQs
1. Can I use homemade chocolate cake?
Yes! Feel free to swap out the boxed cake mix for your favorite homemade chocolate cake recipe.
2. Can I substitute the whipped topping?
If you prefer, you can use stabilized whipped cream instead of store-bought whipped topping.
3. Can I make this cake ahead of time?
Absolutely! In fact, the cake tastes even better the next day as the flavors develop. Just store it in the refrigerator until ready to serve.
4. Can I add other fillings?
Yes! You can add sliced strawberries, raspberries, or even a layer of caramel sauce to the filling for extra flavor.
5. How can I prevent the cake from sticking to the pans?
Grease and flour your cake pans, or line them with parchment paper, to ensure the cakes release easily.
Final Thoughts
This HoHo Cake is the perfect combination of rich chocolate and fluffy filling, making it a nostalgic treat everyone will love. Whether you’re serving it at a special occasion or just indulging in a slice for yourself, it’s sure to satisfy your sweet tooth. Simple, decadent, and absolutely delicious—this cake is a guaranteed crowd-pleaser!
HoHo Cake
Ingredients
For the Cake:
- 1 box chocolate cake mix prepared according to package directions
- 1 can milk chocolate frosting
For the Filling:
- 8 ounces cream cheese softened
- ½ cup unsalted butter 1 stick, softened
- 3 cups confectioners' sugar
- 8 ounces whipped topping like Cool Whip
Instructions
- Bake the cake: Prepare the chocolate cake mix according to the package instructions. Pour the batter into two 9-inch round cake pans and bake as directed. Let the cakes cool completely before assembling.
- Make the filling: In a large mixing bowl, beat the softened cream cheese and butter together until smooth and creamy. Gradually add the confectioners' sugar, mixing until well combined. Fold in the whipped topping until the filling is light and fluffy.
- Assemble the cake: Place one cake layer on a serving plate. Spread a generous amount of the filling over the top. Place the second cake layer on top, gently pressing it down.
- Frost the cake: Spread the milk chocolate frosting evenly over the top and sides of the cake, covering it completely.
- Chill the cake: For best results, refrigerate the cake for at least 2 hours to allow the flavors to meld and the filling to set.
- Serve and enjoy: Slice and serve this HoHo-inspired cake chilled or at room temperature!
Notes
- For an extra decorative touch, use a piping bag to add swirls of cream filling on top before frosting.
- Freeze the cake layers for 30 minutes before assembling to make handling easier.