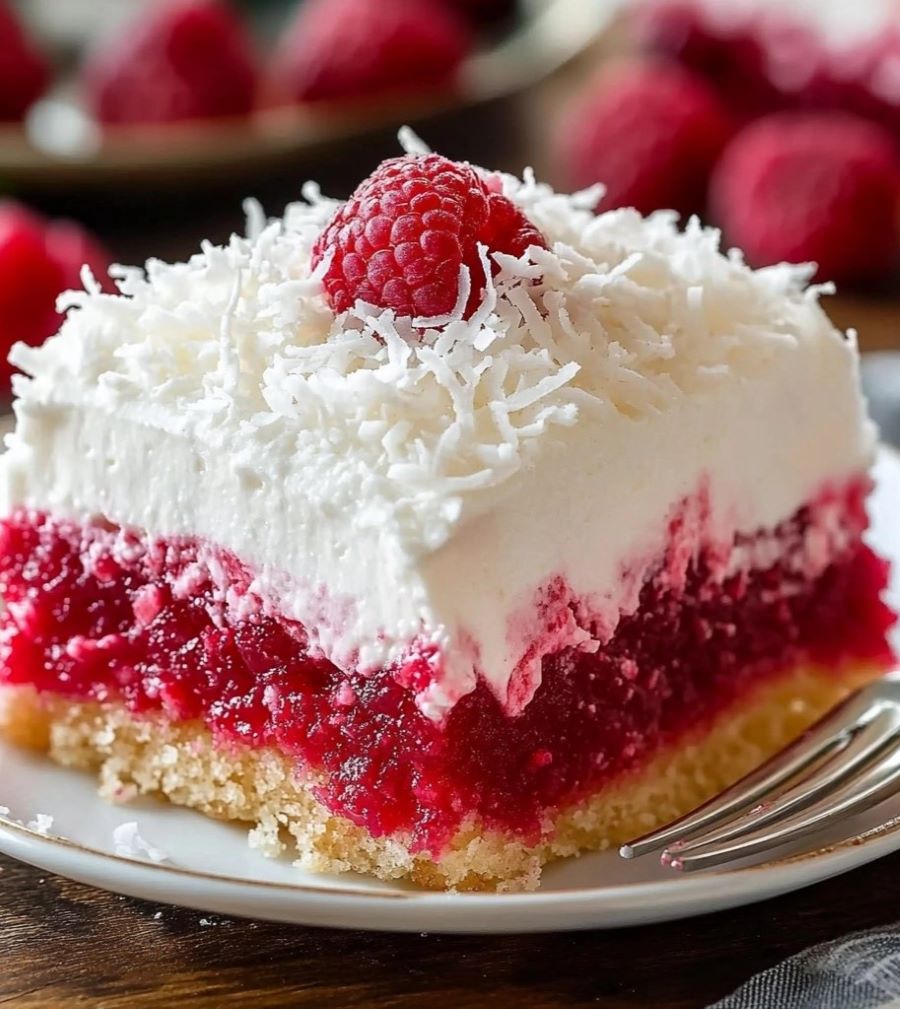
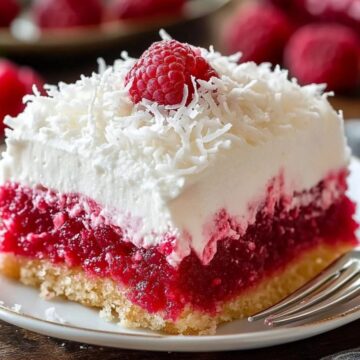
If you’re a fan of the classic Raspberry Zinger snack cakes, you’re going to love this Raspberry Zinger Poke Cake! This dessert takes all the nostalgic flavors—moist white cake, tangy raspberry filling, creamy topping, and sweet coconut—and transforms them into a decadent yet simple-to-make poke cake. The first time I made this, it was an instant hit at a family gathering, with everyone asking for seconds (and the recipe!). It’s perfect for holidays, potlucks, or any time you crave a fruity, creamy dessert.
Why You’ll Love This Recipe
- Easy to Make: A simple cake mix base makes this recipe quick and foolproof.
- Moist and Flavorful: The raspberry gelatin seeps into every bite, ensuring a juicy, flavorful cake.
- Creamy & Dreamy Layers: The combination of cream cheese and whipped topping gives a rich yet airy texture.
- Perfectly Sweet & Tangy: The balance of raspberry preserves, coconut, and cream cheese makes every bite heavenly.
- Great for Any Occasion: Whether for Easter, summer parties, or just a fun dessert night, this cake always impresses.
Ingredients You’ll Need
For the Cake:
- 1 box white cake mix (plus ingredients listed on the box, such as eggs, oil, and water)
- 1 package (3 oz) raspberry gelatin (Jell-O)
- 1 cup boiling water
- ½ cup cold water
For the Filling & Topping:
- 1½ cups whipped cream or Cool Whip
- 1½ cups sweetened shredded coconut
- 1 package (8 oz) cream cheese, softened
- 1 cup powdered sugar
- 1 teaspoon vanilla extract
- ½ cup raspberry preserves
Step-by-Step Instructions
1. Prepare the Cake:
- Preheat your oven according to the white cake mix instructions.
- Grease a 9x13-inch baking pan and prepare the cake batter as directed on the box.
- Pour the batter into the prepared pan and bake according to package instructions.
- Let the cake cool for 10 minutes before proceeding to the next step.
2. Poke & Soak:
- Using the handle of a wooden spoon, poke holes evenly across the surface of the cake.
- In a small bowl, dissolve the raspberry gelatin in 1 cup boiling water.
- Stir in ½ cup cold water to slightly cool the mixture.
- Slowly pour the gelatin over the cake, ensuring it seeps into the holes.
- Refrigerate the cake for 1 hour to allow the flavors to absorb.
3. Make the Cream Cheese Filling:
- In a mixing bowl, beat the softened cream cheese, powdered sugar, and vanilla extract until smooth and fluffy.
- Gently spread the cream cheese mixture evenly over the chilled cake.
4. Top It Off:
- Spread a generous layer of whipped cream or Cool Whip over the cream cheese filling.
- Sprinkle the shredded coconut evenly on top.
5. Chill & Serve:
- Refrigerate for at least 2 more hours before serving to allow the flavors to meld together.
- Slice and enjoy this creamy, raspberry-filled delight!
Serving and Storage Tips
- Best served chilled to allow the layers to set perfectly.
- Store leftovers in the refrigerator for up to 4 days in an airtight container.
- Freeze individual slices for a future treat; just thaw in the fridge before serving.
- Garnish with fresh raspberries for an extra burst of fruity flavor.
- Drizzle with additional raspberry preserves if you want a bolder raspberry taste.
Helpful Notes
- Poking Tips: Space the holes about 1 inch apart for the gelatin to distribute evenly.
- Alternative Flavors: Swap raspberry gelatin for strawberry or cherry Jell-O for a twist on the classic flavor.
- Use a Homemade White Cake: If you prefer a fully from-scratch cake, use your favorite white cake recipe instead of a boxed mix.
- Want Less Sweetness? Reduce the powdered sugar in the cream cheese layer to ¾ cup.
- No Raspberry Preserves? You can substitute with strawberry or mixed berry jam.
Frequently Asked Questions
1. Can I use a different type of cake mix?
Yes! While white cake mix gives that signature Zinger flavor, you can use vanilla or yellow cake mix if that’s what you have on hand.
2. Do I have to use Cool Whip, or can I use homemade whipped cream?
You can use homemade whipped cream! Simply beat 1½ cups heavy whipping cream with 3 tablespoons powdered sugar until stiff peaks form.
3. How do I make this cake even more like a Raspberry Zinger snack cake?
For an authentic Zinger taste, spread a thin layer of raspberry preserves over the gelatin-soaked cake before adding the cream cheese layer.
4. What if I don’t like coconut?
No problem! Simply omit the shredded coconut or replace it with white chocolate shavings for a different texture.
5. Can I make this cake ahead of time?
Absolutely! This cake actually tastes better the next day as the flavors meld together. You can make it 1-2 days in advance and store it in the fridge.
Final Thoughts
Raspberry Zinger Poke Cake is the ultimate nostalgic dessert that brings together soft, fruity, creamy, and coconutty goodness in every bite. It’s easy to prepare, visually stunning, and a guaranteed crowd-pleaser. Whether you’re making it for Easter, summer barbecues, birthdays, or just because you love a good poke cake, this recipe will quickly become a favorite in your home. Try it out and get ready for rave reviews—because this cake disappears fast!
Raspberry Zinger Poke Cake
Ingredients
For the Cake:
- 1 box white cake mix plus ingredients listed on the box, such as eggs, oil, and water
- 1 package 3 oz raspberry gelatin (Jell-O)
- 1 cup boiling water
- ½ cup cold water
For the Filling & Topping:
- 1½ cups whipped cream or Cool Whip
- 1½ cups sweetened shredded coconut
- 1 package 8 oz cream cheese, softened
- 1 cup powdered sugar
- 1 teaspoon vanilla extract
- ½ cup raspberry preserves
Instructions
Prepare the Cake:
- Preheat your oven according to the white cake mix instructions.
- Grease a 9x13-inch baking pan and prepare the cake batter as directed on the box.
- Pour the batter into the prepared pan and bake according to package instructions.
- Let the cake cool for 10 minutes before proceeding to the next step.
Poke & Soak:
- Using the handle of a wooden spoon, poke holes evenly across the surface of the cake.
- In a small bowl, dissolve the raspberry gelatin in 1 cup boiling water.
- Stir in ½ cup cold water to slightly cool the mixture.
- Slowly pour the gelatin over the cake, ensuring it seeps into the holes.
- Refrigerate the cake for 1 hour to allow the flavors to absorb.
Make the Cream Cheese Filling:
- In a mixing bowl, beat the softened cream cheese, powdered sugar, and vanilla extract until smooth and fluffy.
- Gently spread the cream cheese mixture evenly over the chilled cake.
Top It Off:
- Spread a generous layer of whipped cream or Cool Whip over the cream cheese filling.
- Sprinkle the shredded coconut evenly on top.
Chill & Serve:
- Refrigerate for at least 2 more hours before serving to allow the flavors to meld together.
- Slice and enjoy this creamy, raspberry-filled delight!
Notes
- Poking Tips: Space the holes about 1 inch apart for the gelatin to distribute evenly.
- Alternative Flavors: Swap raspberry gelatin for strawberry or cherry Jell-O for a twist on the classic flavor.
- Use a Homemade White Cake: If you prefer a fully from-scratch cake, use your favorite white cake recipe instead of a boxed mix.
- Want Less Sweetness? Reduce the powdered sugar in the cream cheese layer to ¾ cup.
- No Raspberry Preserves? You can substitute with strawberry or mixed berry jam.

