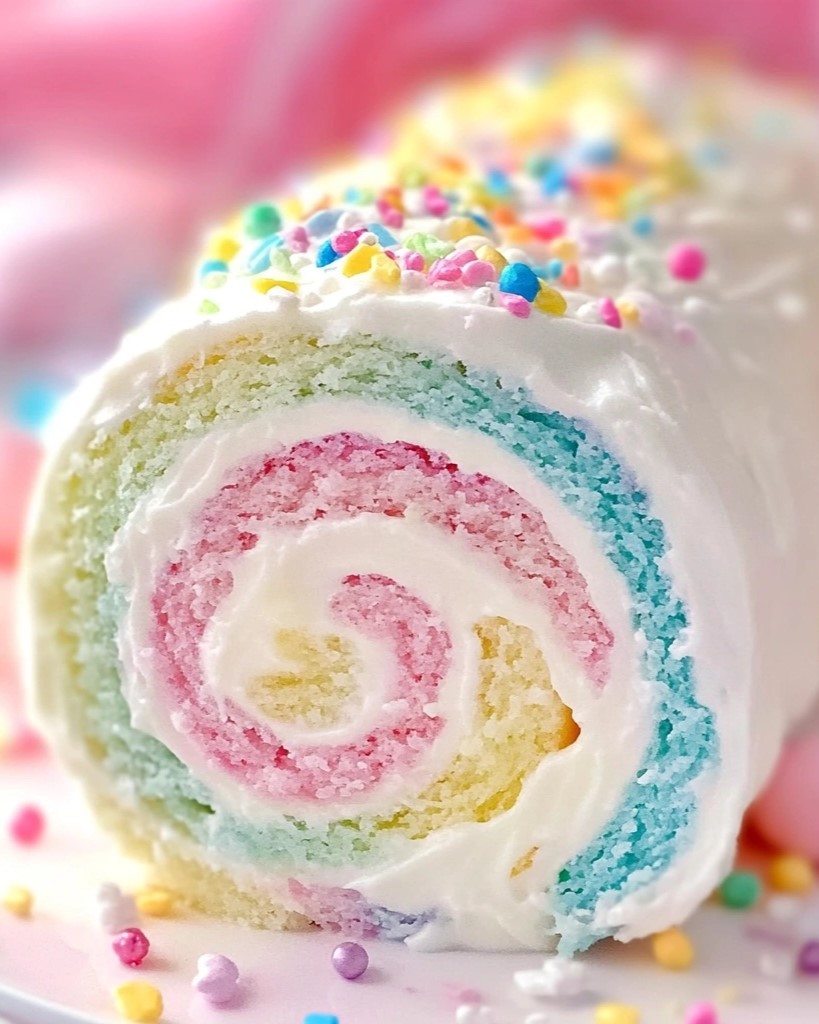
There’s something wonderfully nostalgic about a cake roll. Maybe it’s the delicate sponge, the surprise swirl of creamy filling, or the joy of slicing into that perfect spiral. For me, the Easter Cake Roll is a celebration of spring—a cheerful, pastel-hued dessert that brightens any holiday table. I first made this for an Easter brunch years ago, and it’s been a tradition ever since. Everyone was captivated by the vibrant swirls and melt-in-your-mouth texture.
This recipe is more than just a pretty dessert. It’s soft, light, and balanced with sweet vanilla cream, making each bite as delightful as it looks.
Why You’ll Love This Recipe
- Visually Stunning: The pastel swirls make it a showstopper at any spring celebration.
- Light and Fluffy: The sponge cake is airy and soft, rolled with whipped cream for a heavenly bite.
- Make-Ahead Friendly: Can be prepared ahead of time and chilled until serving.
- Customizable: Switch up colors or add fruit for your own twist.
- Perfect for Gatherings: Yields ten slices—great for sharing at Easter brunch or tea parties.
Ingredients You’ll Need
For the Cake:
- 3 large eggs
- ¾ cup granulated sugar
- 1 teaspoon vanilla extract
- 1 tablespoon vegetable oil
- ¼ cup milk
- ¾ cup all-purpose flour
- 1 teaspoon baking powder
- Pinch of salt
- Gel food coloring (pastel pink, green, blue, yellow)
For the Filling:
- 1 ½ cups heavy whipping cream
- ¼ cup powdered sugar
- ½ teaspoon vanilla extract
Topping (Optional):
- Whipped cream
- Pastel sprinkles
Substitutions: Use stabilized whipped topping if you prefer, or add lemon zest to the filling for a citrusy twist.
Step-by-Step Instructions
1. Preheat and Prepare the Pan
Preheat your oven to 350°F (175°C). Line a 10x15-inch jelly roll pan with parchment paper and lightly grease it to ensure an easy release.
2. Make the Cake Batter
In a large bowl, beat the eggs and sugar on high speed until thick and pale—5 to 7 minutes. Add vanilla, oil, and milk, and mix until combined.
Tip: The long mixing time helps incorporate air for a fluffy sponge.
3. Mix the Dry Ingredients
In a separate bowl, whisk together flour, baking powder, and a pinch of salt. Gradually fold the dry mixture into the wet ingredients using a spatula.
Tip: Fold gently to preserve the airiness of the batter.
4. Color the Batter
Divide the batter evenly into 4 small bowls. Tint each with a different pastel gel food coloring. Spoon small dollops of each color randomly onto the prepared pan, then swirl gently with a skewer or butter knife to create a marbled effect.
5. Bake the Cake
Bake for 10–12 minutes or until the cake springs back lightly when touched.
6. Roll While Warm
Immediately turn the cake out onto a clean kitchen towel dusted with powdered sugar. Peel off the parchment, then roll the cake (short end to short end) with the towel. Let it cool completely while rolled.
Tip: Rolling while warm helps prevent cracking.
7. Prepare the Filling
In a chilled bowl, beat the heavy whipping cream, powdered sugar, and vanilla extract until stiff peaks form.
8. Fill and Roll the Cake
Unroll the cooled cake gently. Spread the whipped cream filling evenly over the surface. Re-roll the cake (without the towel), using gentle pressure.
9. Decorate and Chill
Frost the top with more whipped cream and decorate with pastel sprinkles if desired. Chill for at least 30 minutes before slicing for clean edges.
Serving and Storage Tips
Serving: Slice with a sharp knife for clean spirals. Serve chilled with tea or coffee for an elegant touch.
Storage: Store in an airtight container in the refrigerator for up to 3 days.
Freezing: Can be frozen (without toppings) for up to 2 months. Wrap tightly in plastic and thaw overnight in the fridge.
Helpful Notes
- Use Gel Food Coloring: Gel doesn’t thin the batter like liquid food coloring does, giving more vibrant pastel tones.
- Avoid Overmixing: Overmixing can deflate your batter and result in a dense sponge.
- Cool Completely: Before adding the whipped cream, ensure the cake is completely cool to prevent melting.
- Add Flavor: Try almond or lemon extract in the cake batter for a twist.
Frequently Asked Questions
- Can I make this cake ahead of time?
Yes! It actually improves with a few hours of chilling. Make it the day before and store it in the fridge. - What if my cake cracks when rolling?
This can happen if it cools too much before rolling. Next time, roll while it’s warm, and you can always cover minor cracks with whipped cream. - Can I use liquid food coloring?
Gel food coloring is best, but if using liquid, add sparingly to avoid thinning the batter. - Can I add fruit to the filling?
Yes! Thinly sliced strawberries or raspberries make a beautiful and tasty addition. - Why is my sponge flat?
Underbeating the eggs or overmixing the batter can lead to a flat cake. Make sure to beat the eggs until thick and fold gently.
Final Thoughts
This Easter Cake Roll is the ultimate spring dessert—light, colorful, and bursting with seasonal charm. Whether you're hosting brunch, baking with kids, or just want to impress with something beautiful and tasty, this cake checks all the boxes. Serve it with a side of fresh berries or your favorite tea for a picture-perfect presentation.
Have you tried this recipe? Share your favorite color combos or topping ideas in the comments!

Easter Cake Roll
Ingredients
For the Cake:
- 3 large eggs
- ¾ cup granulated sugar
- 1 teaspoon vanilla extract
- 1 tablespoon vegetable oil
- ¼ cup milk
- ¾ cup all-purpose flour
- 1 teaspoon baking powder
- Pinch of salt
- Gel food coloring pastel pink, green, blue, yellow
For the Filling:
- 1 ½ cups heavy whipping cream
- ¼ cup powdered sugar
- ½ teaspoon vanilla extract
Topping (Optional):
- Whipped cream
- Pastel sprinkles
Instructions
Preheat and Prepare the Pan
- Preheat your oven to 350°F (175°C). Line a 10×15-inch jelly roll pan with parchment paper and lightly grease it to ensure an easy release.
Make the Cake Batter
- In a large bowl, beat the eggs and sugar on high speed until thick and pale—5 to 7 minutes. Add vanilla, oil, and milk, and mix until combined.
- Tip: The long mixing time helps incorporate air for a fluffy sponge.
Mix the Dry Ingredients
- In a separate bowl, whisk together flour, baking powder, and a pinch of salt. Gradually fold the dry mixture into the wet ingredients using a spatula.
- Tip: Fold gently to preserve the airiness of the batter.
Color the Batter
- Divide the batter evenly into 4 small bowls. Tint each with a different pastel gel food coloring. Spoon small dollops of each color randomly onto the prepared pan, then swirl gently with a skewer or butter knife to create a marbled effect.
Bake the Cake
- Bake for 10–12 minutes or until the cake springs back lightly when touched.
Roll While Warm
- Immediately turn the cake out onto a clean kitchen towel dusted with powdered sugar. Peel off the parchment, then roll the cake (short end to short end) with the towel. Let it cool completely while rolled.
- Tip: Rolling while warm helps prevent cracking.
Prepare the Filling
- In a chilled bowl, beat the heavy whipping cream, powdered sugar, and vanilla extract until stiff peaks form.
Fill and Roll the Cake
- Unroll the cooled cake gently. Spread the whipped cream filling evenly over the surface. Re-roll the cake (without the towel), using gentle pressure.
Decorate and Chill
- Frost the top with more whipped cream and decorate with pastel sprinkles if desired. Chill for at least 30 minutes before slicing for clean edges.
Notes
- Use Gel Food Coloring: Gel doesn’t thin the batter like liquid food coloring does, giving more vibrant pastel tones.
- Avoid Overmixing: Overmixing can deflate your batter and result in a dense sponge.
- Cool Completely: Before adding the whipped cream, ensure the cake is completely cool to prevent melting.
- Add Flavor: Try almond or lemon extract in the cake batter for a twist.

