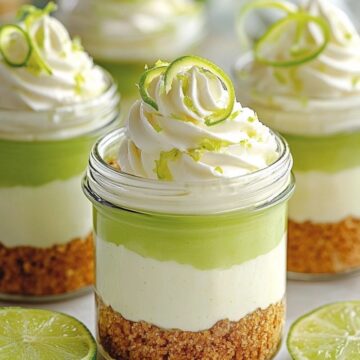
Key lime pie has long been a favorite in my family—a slice of tropical sunshine that instantly brightens up any occasion. One summer, after making yet another full pie for a backyard barbecue, I decided to try something new: individual key lime pies in jars. The result? A perfectly portioned, portable version of the classic dessert that wowed everyone.

These Key Lime Pie Jars deliver everything you love about traditional key lime pie—a buttery graham cracker crust, tangy lime filling, and fluffy whipped cream topping—but in a fun, no-fuss jar. They’re perfect for parties, picnics, or just when you want to treat yourself to a bright, creamy dessert with a twist.
Why You’ll Love This Recipe
- No-Bake & Easy: Simple steps with no oven required (unless you prefer to bake the crust briefly).
- Perfectly Portioned: Individual jars mean easy serving and built-in portion control.
- Zesty & Refreshing: A tart, creamy filling balanced by a rich, buttery crust and cool whipped topping.
- Make-Ahead Friendly: Great for prepping the day before and chilling overnight.
- Picnic and Party Ready: Portable and mess-free—ideal for outdoor entertaining.
Ingredients You’ll Need
For the Crust:
- 1 ½ cups graham cracker crumbs
- ¼ cup granulated sugar
- 6 tablespoons unsalted butter, melted
For the Filling:
- 1 (14 oz) can sweetened condensed milk
- ½ cup sour cream
- ½ cup freshly squeezed key lime juice (or regular lime juice)
- 1 tablespoon lime zest
- A few drops of green gel food coloring (optional, for color)
For the Topping:
- 1 cup heavy whipping cream
- 2 tablespoons powdered sugar
- ½ teaspoon vanilla extract
- Thin lime slices or lime curls, for garnish
Substitutions: Greek yogurt can replace sour cream in the filling. Coconut whipped cream makes a great dairy-free topping.
Step-by-Step Instructions
1. Make the Graham Cracker Crust
In a bowl, stir together the graham cracker crumbs, sugar, and melted butter until the mixture resembles wet sand.
Tip: If you prefer a firmer base, bake the crust in the jars at 350°F (175°C) for 5 minutes and cool before adding the filling.
2. Prepare the Jars
Spoon about 2 tablespoons of crust mixture into the bottom of each small jar (6-8 oz jars work best). Press gently with a spoon to compact the crust. Set aside.
3. Mix the Lime Filling
In a separate bowl, whisk together the sweetened condensed milk, sour cream, lime juice, lime zest, and green gel food coloring (if using). Mix until smooth and creamy.
Tip: Use freshly squeezed key lime juice for the best flavor. If key limes are hard to find, bottled key lime juice or regular lime juice is a good substitute.
4. Spoon in the Filling
Divide the lime filling evenly among the jars, spooning it over the crust layer. Smooth the tops with the back of a spoon.
5. Chill to Set
Refrigerate the jars for at least 2 hours, or overnight for best results. This allows the filling to firm up and the flavors to meld beautifully.
6. Whip the Cream
Just before serving, beat the heavy whipping cream, powdered sugar, and vanilla extract in a chilled bowl until stiff peaks form. This takes about 3-5 minutes with a hand mixer.
7. Top and Garnish
Pipe or spoon the whipped cream on top of each jar. Garnish with a thin slice of lime or a lime zest curl for a pop of color and flavor.
Serving and Storage Tips
Serving: Serve cold straight from the fridge. These jars are fantastic on a dessert table, picnic spread, or even in lunchboxes for a sweet surprise.
Storage: Keep covered and refrigerated for up to 3 days. Add the whipped topping just before serving for the freshest presentation.
Freezing: You can freeze the jars (without whipped cream) for up to 1 month. Thaw overnight in the fridge and top before serving.
Helpful Notes
- Use Good Quality Lime Juice: If using bottled juice, make sure it's 100% key lime juice for authentic flavor.
- Compact the Crust: Press the crust firmly into each jar to create a sturdy base that doesn’t crumble.
- Avoid Overmixing Whipped Cream: Stop beating once stiff peaks form to keep the texture light and fluffy.
- Layering Tip: Want to make them even prettier? Layer crust, filling, and whipped cream in alternating layers for a parfait-style dessert.
- Add Texture: A sprinkle of crushed graham crackers or toasted coconut on top adds extra crunch.
Frequently Asked Questions
1. Can I use regular limes instead of key limes?
Yes, regular limes work just fine and are easier to find. The flavor will be slightly less intense, but still delicious.
2. Do I have to use jars?
Not at all! You can use small dessert cups, ramekins, or even a muffin tin lined with cupcake liners for individual servings.
3. Can I bake the filling like a traditional key lime pie?
You can, but it's not necessary here. This recipe sets up nicely with just refrigeration, saving you time and effort.
4. What’s the best way to zest limes?
Use a microplane or fine grater. Be sure to only grate the green part and avoid the white pith, which is bitter.
5. Can I make this dessert dairy-free?
Yes! Use dairy-free condensed milk, coconut yogurt instead of sour cream, and coconut cream for the topping.
6. Can I add fruit to the jars?
Absolutely. Layer in fresh raspberries, blueberries, or mango chunks between the crust and filling for a fruity twist.
Final Thoughts
Key Lime Pie Jars are a delightful blend of simplicity and flavor. With their creamy citrus filling, buttery crust, and light whipped cream topping, they offer a refreshing end to any meal. The individual servings make them perfect for sharing—or not sharing at all!
Whether you're hosting a summer gathering, planning a picnic, or just craving something zesty and sweet, these jars will hit the spot. Plus, they look just as amazing as they taste.
Have you made these before? Let me know your favorite twist—fruit layers, coconut topping, or maybe a chocolate crust? I’d love to hear how you make these mini pies your own!
Key Lime Pie Jars
Ingredients
For the Crust:
- 1 ½ cups graham cracker crumbs
- ¼ cup granulated sugar
- 6 tablespoons unsalted butter melted
For the Filling:
- 1 14 oz can sweetened condensed milk
- ½ cup sour cream
- ½ cup freshly squeezed key lime juice or regular lime juice
- 1 tablespoon lime zest
- A few drops of green gel food coloring optional, for color
For the Topping:
- 1 cup heavy whipping cream
- 2 tablespoons powdered sugar
- ½ teaspoon vanilla extract
- Thin lime slices or lime curls for garnish
Instructions
Make the Graham Cracker Crust
- In a bowl, stir together the graham cracker crumbs, sugar, and melted butter until the mixture resembles wet sand.
Prepare the Jars
- Spoon about 2 tablespoons of crust mixture into the bottom of each small jar (6-8 oz jars work best). Press gently with a spoon to compact the crust. Set aside.
Mix the Lime Filling
- In a separate bowl, whisk together the sweetened condensed milk, sour cream, lime juice, lime zest, and green gel food coloring (if using). Mix until smooth and creamy.
Spoon in the Filling
- Divide the lime filling evenly among the jars, spooning it over the crust layer. Smooth the tops with the back of a spoon.
Chill to Set
- Refrigerate the jars for at least 2 hours, or overnight for best results. This allows the filling to firm up and the flavors to meld beautifully.
Whip the Cream
- Just before serving, beat the heavy whipping cream, powdered sugar, and vanilla extract in a chilled bowl until stiff peaks form. This takes about 3-5 minutes with a hand mixer.
Top and Garnish
- Pipe or spoon the whipped cream on top of each jar. Garnish with a thin slice of lime or a lime zest curl for a pop of color and flavor.
Notes
- Use Good Quality Lime Juice: If using bottled juice, make sure it’s 100% key lime juice for authentic flavor.
- Compact the Crust: Press the crust firmly into each jar to create a sturdy base that doesn’t crumble.
- Avoid Overmixing Whipped Cream: Stop beating once stiff peaks form to keep the texture light and fluffy.
- Layering Tip: Want to make them even prettier? Layer crust, filling, and whipped cream in alternating layers for a parfait-style dessert.
- Add Texture: A sprinkle of crushed graham crackers or toasted coconut on top adds extra crunch.