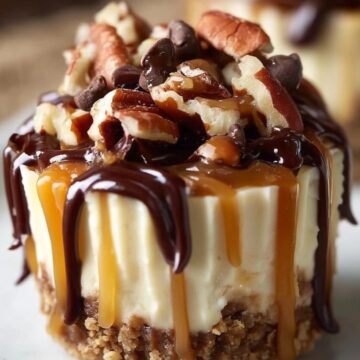
If you’re looking for a decadent, bite-sized dessert that requires zero oven time, these No-Bake Turtle Mini Cheesecakes are here to steal the show. I made them once for a summer barbecue, and they disappeared faster than the lemonade. Creamy, rich cheesecake layered over a buttery graham cracker crust, all crowned with gooey caramel, crunchy pecans, and melty chocolate—they taste just like your favorite turtle candies, but in adorable mini cheesecake form.

What I love most is how effortlessly they come together. No need to preheat the oven or worry about water baths. These treats are chilled to perfection and ready to impress at any party, potluck, or just because. They look elegant, taste amazing, and offer the perfect mix of creamy, crunchy, sweet, and salty in every single bite.
Why You’ll Love This Recipe
- No Baking Required: Ideal for hot days or when your oven is already full.
- Perfect Portions: Mini cheesecakes are great for entertaining or portion control.
- Classic Turtle Flavor: A trio of caramel, pecans, and chocolate that never goes out of style.
- Quick Assembly: Minimal prep time with simple ingredients.
- Make-Ahead Friendly: Chill them in advance for stress-free serving.
- Kid and Crowd Approved: Everyone loves a mini dessert with layers of indulgence.
Ingredients You'll Need
For the Crust:
- 1½ cups graham cracker crumbs
- 2 tablespoons sugar
- ½ cup melted butter
For the Cheesecake Filling:
- 8 oz cream cheese, softened
- ½ cup powdered sugar
- 1 teaspoon vanilla extract
- 1 cup heavy whipping cream
For the Topping:
- ½ cup caramel sauce
- ½ cup chopped pecans
- ½ cup chocolate chips (semisweet or milk chocolate)
Optional: Toasted pecans for added depth of flavor, and a sprinkle of sea salt for a salted caramel twist.
Step-by-Step Instructions
Step 1: Make the Crust
In a medium bowl, stir together the graham cracker crumbs, sugar, and melted butter until the mixture resembles wet sand. Spoon about 1½ tablespoons into each of the 12 lined muffin cups. Use the back of a spoon or a small glass to firmly press the crumbs into a flat crust. Chill the crusts in the fridge while you prepare the filling.
Tip: Want a chocolate twist? Add a teaspoon of cocoa powder to the crust mix.
Step 2: Prepare the Cheesecake Filling
In a large mixing bowl, beat the softened cream cheese until completely smooth. Add in the powdered sugar and vanilla extract, then beat again until creamy and fluffy.
In a separate chilled bowl, whip the heavy cream until stiff peaks form. Carefully fold the whipped cream into the cream cheese mixture in two batches, gently incorporating to maintain a light, airy texture.
Tip: Use a piping bag to fill the crusts for a clean, bakery-style presentation.
Step 3: Assemble the Mini Cheesecakes
Spoon or pipe the cheesecake filling evenly over the prepared crusts, smoothing the tops with the back of a spoon or an offset spatula. Refrigerate for at least 2 hours, or until the filling is firm and set.
Make-Ahead Tip: These can be made up to 2 days in advance and stored covered in the fridge.
Step 4: Add the Turtle Toppings
Just before serving, drizzle each mini cheesecake with caramel sauce, sprinkle with chopped pecans, and finish with a few chocolate chips. If you’d like, top with an extra swirl of caramel or a light dusting of sea salt.
Tip: Toast your pecans in a dry skillet over medium heat for 2-3 minutes to enhance their flavor.
Serving and Storage Tips
Serve these mini cheesecakes chilled for the best texture. They’re perfect for parties and can be presented on a tiered dessert tray or a rustic wooden board with fruit and nuts.
Store leftovers in an airtight container in the fridge for up to 4 days. For longer storage, freeze the cheesecakes (without toppings) in a sealed container. Add the caramel, pecans, and chocolate after thawing.
If you're hosting a large event, you can easily double the recipe and use a mini muffin tin for bite-sized versions.
Helpful Notes
- Cream Cheese Matters: Use full-fat cream cheese for the creamiest texture.
- Consistency Tip: Make sure your whipped cream forms stiff peaks before folding in.
- Toppings Galore: Try crushed pretzels, mini chocolate chips, or a drizzle of chocolate ganache.
- Mini Cheesecake Hack: Use silicone liners or parchment cupcake liners for easy removal.
- Layering Tip: Let each layer chill for 5-10 minutes in the fridge if assembling in steps for extra neatness.
Frequently Asked Questions
- Can I use a store-bought crust? Yes, store-bought mini crusts work in a pinch, but making your own gives better texture and flavor.
- How do I toast pecans? Place chopped pecans in a dry skillet and heat over medium, stirring frequently until fragrant (about 3 minutes).
- Can I make these nut-free? Absolutely. Just skip the pecans and consider adding a sprinkle of cookie crumbs or sprinkles instead.
- What if I don’t have heavy cream? You can substitute whipped topping, but the texture may be slightly different.
- Can I use a different base? Sure! Try crushed Oreos or digestive biscuits instead of graham crackers.
- Can I make these vegan? With dairy-free cream cheese, coconut whipped cream, and vegan toppings, yes, you can adapt it.
- Will they hold up at room temperature? For a short while, yes—but they’re best served chilled, especially in warm weather.
Final Thoughts
No-Bake Turtle Mini Cheesecakes are the ultimate dessert when you want to impress without turning on the oven. They’re cute, creamy, and topped with all the turtle fixings we love. Whether you're making them for a holiday table, a bridal shower, or a Tuesday night treat, these cheesecakes are guaranteed to be devoured.
Have you tried these mini delights? I’d love to hear how you topped yours or any fun twists you added!
No-Bake Turtle Mini Cheesecakes
Ingredients
For the Crust:
- 1½ cups graham cracker crumbs
- 2 tablespoons sugar
- ½ cup melted butter
- For the Cheesecake Filling:
- 8 oz cream cheese softened
- ½ cup powdered sugar
- 1 teaspoon vanilla extract
- 1 cup heavy whipping cream
For the Topping:
- ½ cup caramel sauce
- ½ cup chopped pecans
- ½ cup chocolate chips
- Directions:
Instructions
Step 1: Make the Crust
- In a medium bowl, stir together the graham cracker crumbs, sugar, and melted butter until the mixture resembles wet sand. Spoon about 1½ tablespoons into each of the 12 lined muffin cups. Use the back of a spoon or a small glass to firmly press the crumbs into a flat crust. Chill the crusts in the fridge while you prepare the filling.
- Tip: Want a chocolate twist? Add a teaspoon of cocoa powder to the crust mix.
Step 2: Prepare the Cheesecake Filling
- In a large mixing bowl, beat the softened cream cheese until completely smooth. Add in the powdered sugar and vanilla extract, then beat again until creamy and fluffy.
- In a separate chilled bowl, whip the heavy cream until stiff peaks form. Carefully fold the whipped cream into the cream cheese mixture in two batches, gently incorporating to maintain a light, airy texture.
- Tip: Use a piping bag to fill the crusts for a clean, bakery-style presentation.
Step 3: Assemble the Mini Cheesecakes
- Spoon or pipe the cheesecake filling evenly over the prepared crusts, smoothing the tops with the back of a spoon or an offset spatula. Refrigerate for at least 2 hours, or until the filling is firm and set.
- Make-Ahead Tip: These can be made up to 2 days in advance and stored covered in the fridge.
Step 4: Add the Turtle Toppings
- Just before serving, drizzle each mini cheesecake with caramel sauce, sprinkle with chopped pecans, and finish with a few chocolate chips. If you’d like, top with an extra swirl of caramel or a light dusting of sea salt.
- Tip: Toast your pecans in a dry skillet over medium heat for 2-3 minutes to enhance their flavor.
Notes
- Cream Cheese Matters: Use full-fat cream cheese for the creamiest texture.
- Consistency Tip: Make sure your whipped cream forms stiff peaks before folding in.
- Toppings Galore: Try crushed pretzels, mini chocolate chips, or a drizzle of chocolate ganache.
- Mini Cheesecake Hack: Use silicone liners or parchment cupcake liners for easy removal.
- Layering Tip: Let each layer chill for 5-10 minutes in the fridge if assembling in steps for extra neatness.