If there’s one thing that instantly transforms your kitchen into a cozy haven, it’s the smell of freshly baked bread. For me, that magic comes alive every time I make Rustic No-Knead Rosemary Garlic Bread. This recipe is my go-to for its simplicity, incredible flavor, and the way it fills my home with the irresistible aroma of rosemary and garlic.

My journey with bread-making has always been one of trial and error. But when I discovered no-knead bread, it felt like a game-changer. It was foolproof, required minimal effort, and produced bakery-quality results right in my own kitchen. Let me share the story of how this rustic bread became a staple in my home and why it’s one of my all-time favorite recipes.
My First Attempt at No-Knead Bread
The first time I attempted no-knead bread, I was skeptical. Could something so simple really yield the crusty, artisan-style loaf I’d admired at bakeries? With just a few ingredients and no fancy equipment, I gave it a try.
When I pulled that first loaf out of the oven, I was stunned. The golden, crackly crust looked like it belonged on the cover of a cookbook, and the inside was soft and airy with just the right amount of chew. Adding rosemary and garlic elevated the flavor, turning it from a simple loaf into something truly special.
Since then, this bread has become my go-to for everything from cozy dinners at home to holiday gatherings.
Ingredients
- 3 cups all-purpose flour
- 1 ½ teaspoons salt
- ½ teaspoon instant yeast
- 1 ½ cups warm water (110°F/45°C)
- 2 tablespoons fresh rosemary, chopped
- 3 cloves garlic, minced
- 1 tablespoon olive oil
Directions
Step 1: Combine Ingredients
In a large mixing bowl, combine the flour, salt, and instant yeast. Add the chopped rosemary and minced garlic, stirring to distribute them evenly. Pour in the warm water and stir with a wooden spoon or your hands until a shaggy dough forms.
This step always reminds me of how forgiving no-knead bread is—no need for perfection, just mix until everything comes together.
Step 2: Let It Rest
Cover the bowl with plastic wrap or a clean kitchen towel and let it rest at room temperature for 12 to 18 hours. This long rise is what gives the bread its incredible texture and flavor.
The first time I made this bread, I remember peeking under the towel several times, amazed at how the dough transformed. By the next morning, it had doubled in size, with bubbles forming on the surface—a sure sign of success!
Step 3: Shape the Dough
Once the dough has risen, lightly flour your work surface and turn the dough out onto it. With floured hands, gently shape it into a round loaf. No kneading is required—just a few folds to give it structure.
Place the dough on a piece of parchment paper and let it rest for another 30 minutes while the oven heats up.
Step 4: Preheat the Oven and Dutch Oven
Preheat your oven to 450°F (230°C). Place a Dutch oven with its lid inside the oven to heat for at least 30 minutes. This ensures the bread bakes in a hot, steamy environment, which is key to achieving a crisp crust.
The anticipation during this step always excites me. Knowing that the next stage involves baking something so satisfying is part of the joy.
Step 5: Bake the Bread
Carefully remove the hot Dutch oven from the oven and transfer the dough (with the parchment paper) into it. Cover with the lid and bake for 30 minutes.
Remove the lid and bake for an additional 15 minutes, or until the crust is golden brown and crackly. The aroma of rosemary and garlic wafting from the oven at this point is pure heaven.
Step 6: Cool and Enjoy
Remove the bread from the Dutch oven and let it cool on a wire rack for at least 10 minutes before slicing. This step is crucial to allow the interior to set properly.
Tips for Perfect No-Knead Rosemary Garlic Bread
- Use Fresh Ingredients
Fresh rosemary and garlic make a world of difference. Their flavors infuse the bread beautifully, giving it a fragrant, savory kick. - Don't Skip the Long Rise
The long fermentation is what gives this bread its rustic texture and complex flavor. Plan ahead to let the dough rest for at least 12 hours. - Use a Dutch Oven
A Dutch oven traps steam during baking, creating a crusty exterior while keeping the inside soft and airy. If you don’t have one, an oven-safe pot with a lid works too. - Experiment with Add-Ins
While rosemary and garlic are classic, you can get creative with other herbs, grated cheese, or even sun-dried tomatoes. - Store Properly
Store the bread in a paper bag to maintain the crust. For longer storage, wrap it tightly and freeze it.
Why I Keep Coming Back to This Recipe
Making this bread has become a ritual for me. There’s something meditative about mixing the dough in the evening, letting it rise overnight, and baking it the next day. The simplicity of the recipe allows me to focus on the joy of baking rather than getting caught up in complicated steps.
This bread has accompanied countless family meals, from hearty soups to festive holiday spreads. It’s also my go-to for gifting—there’s nothing quite like handing someone a loaf of homemade bread, warm from the oven and wrapped in parchment paper with a sprig of rosemary.
Final Thoughts
Rustic No-Knead Rosemary Garlic Bread is more than just a recipe—it’s a celebration of simplicity and the joy of creating something with your own hands. It’s a reminder that even in a fast-paced world, there’s value in slowing down and savoring the process.
Whether you’re a seasoned baker or trying your hand at bread-making for the first time, this recipe is a foolproof way to impress yourself and others. The combination of crispy crust, soft interior, and the fragrant blend of rosemary and garlic will have you coming back for more.
So, grab a bowl, mix up some dough, and let this bread fill your home with warmth and love.
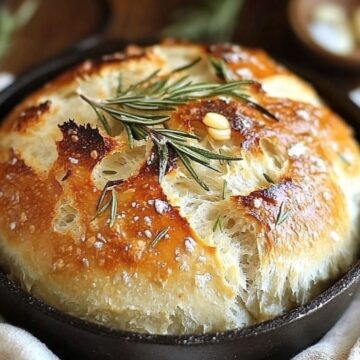
Rustic No Knead Rosemary Garlic Bread
Ingredients
- 3 cups all-purpose flour
- 1 ½ teaspoons salt
- ½ teaspoon instant yeast
- 1 ½ cups warm water 110°F/45°C
- 2 tablespoons fresh rosemary chopped
- 3 cloves garlic minced
- 1 tablespoon olive oil
Instructions
Step 1: Combine Ingredients
- In a large mixing bowl, combine the flour, salt, and instant yeast. Add the chopped rosemary and minced garlic, stirring to distribute them evenly. Pour in the warm water and stir with a wooden spoon or your hands until a shaggy dough forms.
- This step always reminds me of how forgiving no-knead bread is—no need for perfection, just mix until everything comes together.
Step 2: Let It Rest
- Cover the bowl with plastic wrap or a clean kitchen towel and let it rest at room temperature for 12 to 18 hours. This long rise is what gives the bread its incredible texture and flavor.
- The first time I made this bread, I remember peeking under the towel several times, amazed at how the dough transformed. By the next morning, it had doubled in size, with bubbles forming on the surface—a sure sign of success!
Step 3: Shape the Dough
- Once the dough has risen, lightly flour your work surface and turn the dough out onto it. With floured hands, gently shape it into a round loaf. No kneading is required—just a few folds to give it structure.
- Place the dough on a piece of parchment paper and let it rest for another 30 minutes while the oven heats up.
Step 4: Preheat the Oven and Dutch Oven
- Preheat your oven to 450°F (230°C). Place a Dutch oven with its lid inside the oven to heat for at least 30 minutes. This ensures the bread bakes in a hot, steamy environment, which is key to achieving a crisp crust.
- The anticipation during this step always excites me. Knowing that the next stage involves baking something so satisfying is part of the joy.
Step 5: Bake the Bread
- Carefully remove the hot Dutch oven from the oven and transfer the dough (with the parchment paper) into it. Cover with the lid and bake for 30 minutes.
- Remove the lid and bake for an additional 15 minutes, or until the crust is golden brown and crackly. The aroma of rosemary and garlic wafting from the oven at this point is pure heaven.
Step 6: Cool and Enjoy
- Remove the bread from the Dutch oven and let it cool on a wire rack for at least 10 minutes before slicing. This step is crucial to allow the interior to set properly.
Notes
-
Use Fresh Ingredients
Fresh rosemary and garlic make a world of difference. Their flavors infuse the bread beautifully, giving it a fragrant, savory kick. -
Don't Skip the Long Rise
The long fermentation is what gives this bread its rustic texture and complex flavor. Plan ahead to let the dough rest for at least 12 hours. -
Use a Dutch Oven
A Dutch oven traps steam during baking, creating a crusty exterior while keeping the inside soft and airy. If you don’t have one, an oven-safe pot with a lid works too.