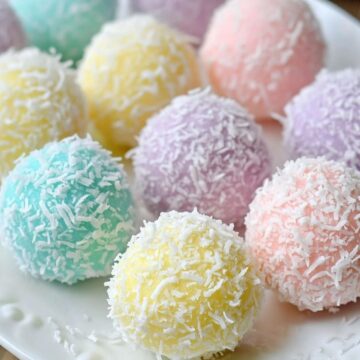
These Easter Bunny Coconut Tails are sweet, chewy, and loaded with coconut goodness! Made with just four ingredients, they come together quickly with no baking required. Colored in beautiful pastel shades, these little coconut treats look just like fluffy bunny tails, making them a perfect addition to Easter baskets, dessert platters, or springtime parties!

If you love coconut macaroons or no-bake treats, these soft, melt-in-your-mouth coconut balls will be your new favorite Easter candy!
Why You’ll Love This Recipe
✔️ No-Bake & Super Easy – Just mix, roll, and chill!
✔️ 4 Simple Ingredients – No fancy equipment or baking required.
✔️ Festive & Fun – Perfect for Easter baskets, gifts, or party treats.
✔️ Make-Ahead Friendly – Stays fresh for up to a week in the fridge!
✔️ Customizable Colors – Use pastel food coloring for a bright, festive look!
Recipe
Ingredients
- 1 can (14 oz) sweetened condensed milk
- 1 teaspoon vanilla extract
- 4 cups shredded sweetened coconut (plus extra for rolling)
- Gel food coloring (pastel pink, yellow, blue, green, and purple)
Directions
Step 1: Prepare the Coconut Mixture
- In a large mixing bowl, stir together the sweetened condensed milk and vanilla extract until combined.
- Gradually add the shredded coconut, stirring until well coated and the mixture holds together.
Step 2: Color & Shape the Coconut Tails
- Divide the coconut mixture into 4-5 equal portions (depending on how many colors you want).
- Add a few drops of gel food coloring to each portion, mixing well until the color is evenly distributed. (Tip: Wear gloves to avoid staining your hands!)
- Using your hands, roll small portions into 1-inch balls to form the bunny tails.
Step 3: Coat & Chill
- Roll each ball in extra shredded coconut to fully coat and give them a fluffy bunny tail look.
- Place the coconut tails on a parchment-lined tray.
- Refrigerate for at least 1 hour to set.
Step 4: Serve & Enjoy!
- Arrange the colorful coconut tails on a festive Easter platter.
- Serve chilled or at room temperature for a sweet and chewy treat!
Serving and Storage Tips
How to Serve:
- Perfect for Easter baskets or holiday dessert platters.
- Gift in cute Easter-themed boxes or bags for a homemade treat!
- Serve alongside chocolate eggs, bunny cookies, or carrot cake for a festive dessert spread.
How to Store:
- Refrigerator: Store in an airtight container in the fridge for up to 1 week.
- Freezer: Freeze in a sealed bag or container for up to 2 months. Thaw before serving.
Helpful Notes
- Use Gel Food Coloring – Gel colors give a bright pastel shade without thinning the mixture.
- Coconut Substitutions – If you prefer unsweetened coconut, you can use it, but the texture will be slightly drier.
- Add Extra Flavor – Try mixing in ½ teaspoon of almond or coconut extract for extra depth of flavor.
- Make It Even More Fun – Roll in colored sanding sugar or edible glitter for sparkle!
- Adjust the Size – Make mini coconut tails or larger ones for a centerpiece treat.
frequently asked questions
1. Can I use liquid food coloring instead of gel?
Yes, but liquid food coloring may thin the mixture slightly. Use sparingly!
2. How do I keep the coconut tails from sticking to my hands?
Lightly grease your hands with butter or coconut oil before rolling the balls.
3. Can I make these dairy-free?
Yes! Use coconut condensed milk for a dairy-free version.
4. How long do these last at room temperature?
They can stay at room temperature for 2-3 hours, but for the best texture, keep them chilled until serving.
5. Can I make these ahead of time?
Absolutely! They actually taste better the next day after chilling in the fridge.
Final Thoughts
These Easter Bunny Coconut Tails are the perfect festive, no-bake treat for Easter and spring celebrations! With sweet coconut, soft texture, and beautiful pastel colors, they’re sure to be a hit with kids and adults alike.
So grab your coconut, condensed milk, and food coloring, and make a batch of these adorable, fluffy bunny tails today!
Easter Bunny Coconut Tails
Ingredients
- 1 can 14 oz sweetened condensed milk
- 1 teaspoon vanilla extract
- 4 cups shredded sweetened coconut plus extra for rolling
- Gel food coloring pastel pink, yellow, blue, green, and purple
Instructions
Step 1: Prepare the Coconut Mixture
- In a large mixing bowl, stir together the sweetened condensed milk and vanilla extract until combined.
- Gradually add the shredded coconut, stirring until well coated and the mixture holds together.
Step 2: Color & Shape the Coconut Tails
- Divide the coconut mixture into 4-5 equal portions (depending on how many colors you want).
- Add a few drops of gel food coloring to each portion, mixing well until the color is evenly distributed. (Tip: Wear gloves to avoid staining your hands!)
- Using your hands, roll small portions into 1-inch balls to form the bunny tails.
Step 3: Coat & Chill
- Roll each ball in extra shredded coconut to fully coat and give them a fluffy bunny tail look.
- Place the coconut tails on a parchment-lined tray.
- Refrigerate for at least 1 hour to set.
Step 4: Serve & Enjoy!
- Arrange the colorful coconut tails on a festive Easter platter.
- Serve chilled or at room temperature for a sweet and chewy treat!
Notes
- Use Gel Food Coloring – Gel colors give a bright pastel shade without thinning the mixture.
- Coconut Substitutions – If you prefer unsweetened coconut, you can use it, but the texture will be slightly drier.
- Add Extra Flavor – Try mixing in ½ teaspoon of almond or coconut extract for extra depth of flavor.
- Make It Even More Fun – Roll in colored sanding sugar or edible glitter for sparkle!
- Adjust the Size – Make mini coconut tails or larger ones for a centerpiece treat.