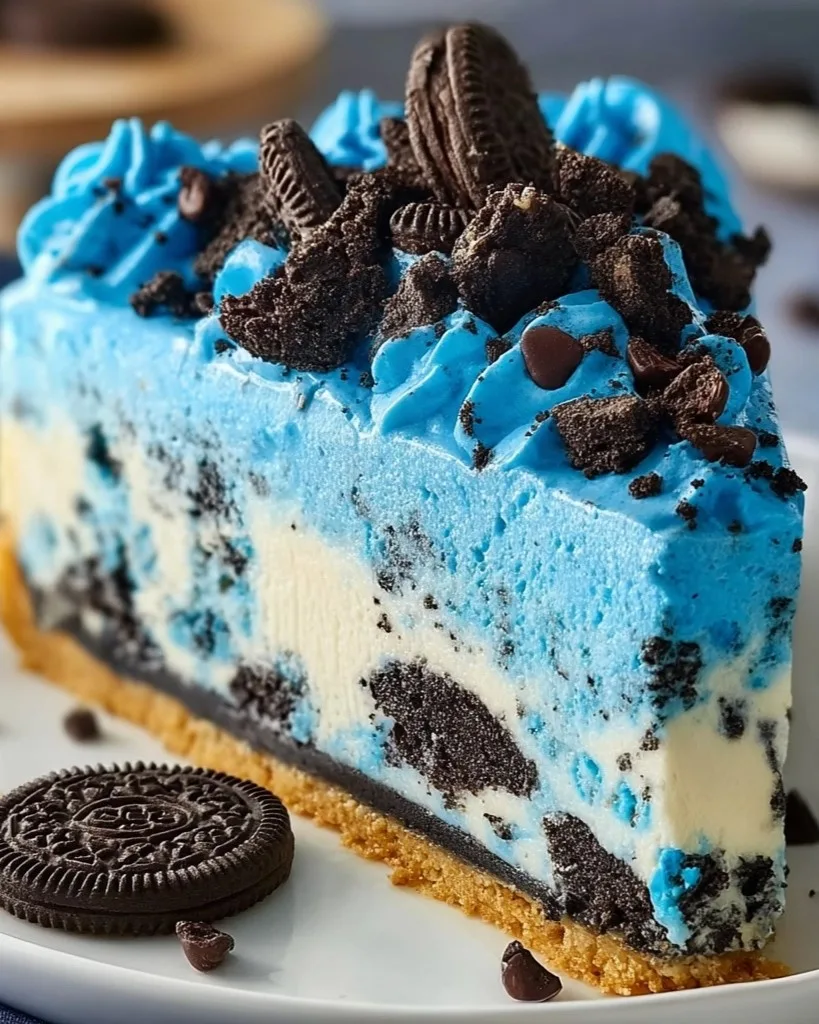
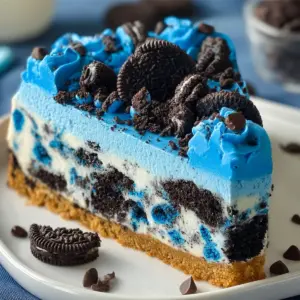
There’s something about blue desserts that instantly captures a child’s imagination—and let’s be honest, adults too! The first time I made this Cookie Monster Cheesecake, it wasn’t just dessert; it became the star of the party. I made it for my daughter’s preschool graduation, and the gasps of delight when I brought it out still make me smile. This colorful, no-bake cheesecake is an ode to fun, joy, and of course, our favorite cookie-loving monster.

This dessert isn’t just a treat—it’s an experience. From the bright blue hue to the chunks of cookies hidden in every creamy bite, it feels like something straight out of a storybook. Whether you’re planning a themed birthday bash, a bake sale table, or a whimsical weekend surprise, this recipe guarantees big smiles and empty plates.
Why You’ll Love Cookie Monster Cheesecake
- Vibrant and fun – The electric blue color is eye-catching and festive.
- Great for kids and adults alike – A nostalgic dessert that delights all ages.
- No baking needed – Keep the oven off and your kitchen cool.
- Loaded with cookies – Each bite is bursting with cookie crunch and chocolate chips.
- Make ahead magic – Perfect for prepping the night before an event.
- Easy to customize – Switch up cookies, add sprinkles, or turn it into mini cheesecakes.
Ingredients You’ll Need
For the crust:
- 24 Oreo cookies, crushed – Use a food processor for a fine texture.
- 5 tablespoons unsalted butter, melted – Mix with cookie crumbs to hold the crust together.
For the filling:
- 16 oz cream cheese, softened – Let it sit at room temperature for easier blending.
- 1 cup granulated sugar – Sweetens the tangy cream cheese perfectly.
- 2 teaspoons vanilla extract – Adds a comforting flavor base.
- 2 cups heavy whipping cream – Whipped to stiff peaks to make the filling airy.
- 1 packet unflavored gelatin – Helps the cheesecake set firmly.
- ¼ cup cold water – For blooming the gelatin.
- Blue food coloring – Gel or liquid; adjust to your desired Cookie Monster shade.
- 1 ½ cups mini chocolate chip cookies, chopped – Adds texture and sweetness.
- 1 ½ cups mini Oreos, chopped – Adds crunch and a signature cookie flavor.
For topping:
- Extra mini cookies, mini Oreos, chocolate chips, and candy eyes – For decoration and flair.
Step-by-Step Instructions
1. Make the Crust
- Crush the Oreos until they’re fine crumbs.
- Mix in melted butter until the texture resembles wet sand.
- Press the mixture firmly into the base of a 9-inch springform pan.
- Place in the fridge for at least 30 minutes to set.
2. Prepare the Whipped Cream
- Pour the heavy cream into a chilled mixing bowl.
- Beat with a hand or stand mixer until stiff peaks form.
- Set aside in the fridge while you prepare the rest.
3. Bloom and Melt the Gelatin
- Sprinkle gelatin over cold water in a small microwave-safe bowl.
- Let it sit for 5 minutes to bloom.
- Microwave for 10–15 seconds until dissolved. Let cool slightly.
4. Mix the Cream Cheese Base
- In a large mixing bowl, beat cream cheese, sugar, and vanilla extract until smooth.
- Pour in the cooled gelatin and mix until combined.
- Add blue food coloring, a few drops at a time, until you get your desired Cookie Monster color.
5. Fold in the Whipped Cream
- Using a rubber spatula, gently fold the whipped cream into the blue cream cheese mixture.
- Mix slowly to keep the filling light and fluffy.
6. Add Cookies
- Fold in chopped mini chocolate chip cookies and mini Oreos.
- Make sure the pieces are evenly distributed.
7. Assemble the Cheesecake
- Pour the mixture over your chilled Oreo crust.
- Smooth out the top with a spatula.
- Tap the pan gently on the counter to remove any air bubbles.
8. Chill Until Set
- Cover the cheesecake with plastic wrap.
- Refrigerate for at least 6 hours, preferably overnight.
9. Decorate Before Serving
- Decorate the top with whole mini cookies, chopped Oreos, chocolate chips, and candy eyes.
- Make it fun—Cookie Monster’s face, cookie piles, or colorful sprinkles all work great!
Serving and Storage Tips
- Serve cold – This cheesecake is best enjoyed straight from the fridge.
- Use a hot knife – For cleaner slices, run your knife under hot water and wipe between cuts.
- Make mini versions – Use muffin tins with liners for party-sized treats.
- Refrigerate leftovers – Store in an airtight container for up to 5 days.
- Freeze for later – Wrap tightly in plastic wrap and foil; freeze for up to a month. Thaw in the fridge before serving.
Helpful Notes
- Make it gluten-free: Use gluten-free sandwich cookies and chocolate chip cookies.
- Dairy-free option: Substitute with dairy-free cream cheese and coconut whipped cream.
- Natural color alternative: Use spirulina powder or blue matcha for a natural tint.
- Change up the base: Try a chocolate chip cookie crust or graham cracker crust.
- Decorating tip: Add frosting swirls and blue sprinkles for extra pizzazz.
Frequently Asked Questions
- Can I use store-bought whipped topping instead of whipped cream? Yes, you can use 2 cups of whipped topping (like Cool Whip) if you prefer convenience. Just fold it in gently.
- What’s the best food coloring for this cheesecake? Gel food coloring offers vibrant color without thinning the mixture. Brands like Wilton or AmeriColor work well.
- Do I need a springform pan? It’s highly recommended for easy removal. If you don’t have one, use a deep pie dish and serve directly from it.
- Can I skip the gelatin? You can, but the cheesecake may be softer. Agar-agar powder is a vegetarian alternative that works well.
- How far ahead can I make this? You can prepare this cheesecake up to 2 days in advance. Just keep it well-covered in the fridge.
Final Thoughts
If you’re looking to create a dessert that’s both playful and delicious, this Cookie Monster Cheesecake is a perfect pick. It’s ideal for parties, celebrations, or just a weekend when you want to bake something fun with the kids. With its vibrant color, luscious texture, and generous cookie chunks, every bite is a celebration.
This recipe invites creativity—add candy eyes, colorful sprinkles, or themed cupcake toppers. However you decide to decorate, know that this cheesecake brings the fun. If you give it a try, share your masterpiece online and tag me—I love seeing your sweet creations. Happy no-baking and enjoy every monster-sized bite!
Cookie Monster Cheesecake
Equipment
- 9-inch springform pan
- Mixing bowls
- Electric mixer
- Rubber spatula
- Measuring cups and spoons
- Microwave-safe bowl
Ingredients
For the crust:
- 24 Oreo cookies crushed
- 5 tablespoons unsalted butter melted
For the filling:
- 16 oz cream cheese softened
- 1 cup granulated sugar
- 2 teaspoons vanilla extract
- 2 cups heavy whipping cream
- 1 packet unflavored gelatin
- ¼ cup cold water
- Blue food coloring to desired shade
- 1 ½ cups mini chocolate chip cookies chopped
- 1 ½ cups mini Oreos chopped
For topping:
- Extra mini cookies mini Oreos, chocolate chips, and candy eyes
Instructions
- Crush Oreos and mix with melted butter. Press into a 9-inch springform pan. Chill for 30 minutes.
- Whip heavy cream to stiff peaks and refrigerate.
- Bloom gelatin in cold water; microwave to dissolve. Cool slightly.
- Beat cream cheese, sugar, and vanilla until smooth. Add gelatin.
- Add blue food coloring to desired color.
- Gently fold in whipped cream.
- Stir in chopped cookies and mini Oreos.
- Pour mixture over crust and smooth top.
- Refrigerate at least 6 hours or overnight.
- Decorate with cookies, chips, and candy eyes before serving.
Notes
- Use gel food coloring for vibrant color.
- Substitute with gluten-free or dairy-free ingredients as needed.
- Can be frozen for up to 1 month.
- Add candy eyes for extra fun!
Leave a Reply