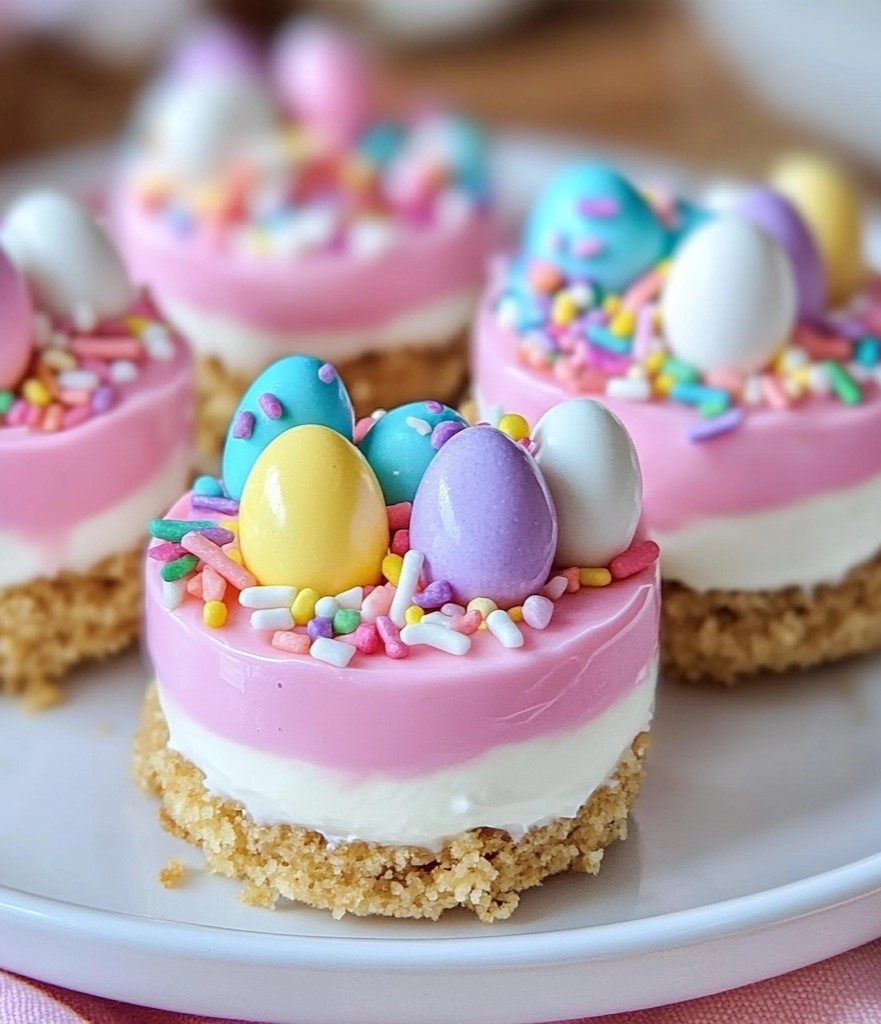
These Easter No-Bake Mini Cheesecakes are the perfect festive treat for your holiday dessert table! They feature a buttery graham cracker crust, a light and creamy cheesecake filling, and a pastel-colored white chocolate topping, all decorated with Easter sprinkles and candy eggs.
What’s even better? No baking required! These cheesecakes come together effortlessly, making them ideal for a fun, stress-free Easter dessert that’s sure to impress. Whether you're serving them at a family brunch, Easter party, or just indulging in a sweet treat, these adorable mini cheesecakes will be a guaranteed hit!
Why You’ll Love This Recipe
✔️ No-Bake & Easy to Make – No need to turn on the oven! Just mix, chill, and enjoy.
✔️ Perfectly Creamy & Light – The filling is silky-smooth, thanks to the whipped cream and cream cheese.
✔️ Festive & Customizable – Decorate with Easter sprinkles, pastel colors, and mini eggs for a fun, seasonal treat.
✔️ Great for Entertaining – Mini cheesecakes are perfectly portioned, making them ideal for parties.
✔️ Make-Ahead Friendly – Chill them overnight for the best texture and flavor.
Recipe
Ingredients
For the Crust:
- 1 ½ cups graham cracker crumbs
- ¼ cup unsalted butter, melted
- 2 tablespoons sugar
For the Cheesecake Filling:
- 8 oz cream cheese, softened
- ½ cup powdered sugar
- 1 teaspoon vanilla extract
- 1 cup heavy whipping cream
For the Topping:
- ½ cup white chocolate, melted
- Pink food coloring (or any pastel color of choice)
- Easter sprinkles
- Mini candy eggs (like Cadbury Mini Eggs or M&M's Eggs)
Directions
Step 1: Prepare the Crust
- In a medium bowl, mix together the graham cracker crumbs, melted butter, and sugar until combined.
- Divide the mixture evenly among 12 mini cheesecake molds or muffin liners, pressing it down firmly with the back of a spoon.
- Place in the refrigerator while preparing the filling.
Step 2: Make the Cheesecake Filling
- In a large bowl, beat the softened cream cheese, powdered sugar, and vanilla extract until smooth and creamy.
- In a separate bowl, whip the heavy cream until stiff peaks form (about 2-3 minutes).
- Gently fold the whipped cream into the cream cheese mixture, making sure not to deflate it.
- Spoon or pipe the cheesecake filling over the chilled crusts, smoothing the tops.
Step 3: Add the Topping
- Melt the white chocolate in the microwave in 30-second intervals, stirring after each interval until smooth.
- Add a few drops of pink food coloring (or any pastel shade of choice) and stir until evenly colored.
- Spread a thin layer of the melted chocolate over each cheesecake.
Step 4: Decorate & Chill
- Sprinkle each cheesecake with Easter sprinkles and top with mini candy eggs for a festive look.
- Refrigerate for at least 2 hours (or overnight for best results) before serving.
Step 5: Serve & Enjoy!
- Gently remove the cheesecakes from the molds and serve chilled.
Serving and Storage Tips
How to Serve:
- Enjoy these chilled for the best texture.
- Add whipped cream and extra chocolate drizzle for an extra indulgent touch.
- Serve alongside fresh berries for a bright, fruity contrast.
How to Store:
- Refrigerator: Store in an airtight container in the fridge for up to 3 days.
- Freezer: Freeze for up to 1 month. Thaw in the fridge for a few hours before serving.
Helpful Notes
- Use a Silicone Muffin Mold for Easy Removal – This helps the cheesecakes pop out smoothly without sticking.
- Don’t Over-Mix the Whipped Cream – Gently fold it in to keep the cheesecake light and airy.
- Try a Different Crust – Swap graham crackers for chocolate cookies or vanilla wafers for a fun twist!
- Customize the Colors – Use different pastel food colors to create a rainbow effect.
- Make Them Gluten-Free – Use gluten-free graham crackers for a gluten-free version.
frequently asked questions
1. Can I use store-bought whipped topping instead of heavy cream?
Yes! You can use 1 ½ cups of Cool Whip instead of whipping heavy cream.
2. What if I don’t have mini cheesecake molds?
You can use a regular muffin tin with paper liners or even make a large version in a 9-inch springform pan.
3. Can I use dark or milk chocolate instead of white chocolate?
Absolutely! White chocolate keeps the pastel color bright, but you can use any melted chocolate you prefer.
4. How can I make these cheesecakes extra creamy?
Make sure the cream cheese is fully softened before mixing and use full-fat cream cheese for the best texture.
5. Can I make these a day ahead?
Yes! These mini cheesecakes actually taste better the next day as the flavors develop, so feel free to make them in advance.
Final Thoughts
These Easter No-Bake Mini Cheesecakes are adorable, delicious, and effortless to make! With their buttery crust, silky cheesecake filling, and festive pastel decorations, they’re sure to be a hit at any Easter gathering.
Since they require no baking, they’re also kid-friendly and perfect for making ahead, so you can enjoy your holiday stress-free. Whether you’re hosting Easter brunch, a spring celebration, or simply treating yourself, these cheesecakes will bring a little extra joy to the table!
So grab your pastel sprinkles, candy eggs, and creamy cheesecake ingredients, and get ready to make a delicious and festive dessert that everyone will love!
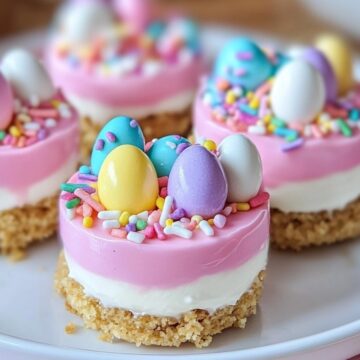
Easter No-Bake Mini Cheesecakes
Ingredients
For the Crust:
- 1 ½ cups graham cracker crumbs
- ¼ cup unsalted butter melted
- 2 tablespoons sugar
For the Cheesecake Filling:
- 8 oz cream cheese softened
- ½ cup powdered sugar
- 1 teaspoon vanilla extract
- 1 cup heavy whipping cream
For the Topping:
- ½ cup white chocolate melted
- Pink food coloring or any pastel color of choice
- Easter sprinkles
- Mini candy eggs like Cadbury Mini Eggs or M&M's Eggs
Instructions
Step 1: Prepare the Crust
- In a medium bowl, mix together the graham cracker crumbs, melted butter, and sugar until combined.
- Divide the mixture evenly among 12 mini cheesecake molds or muffin liners, pressing it down firmly with the back of a spoon.
- Place in the refrigerator while preparing the filling.
Step 2: Make the Cheesecake Filling
- In a large bowl, beat the softened cream cheese, powdered sugar, and vanilla extract until smooth and creamy.
- In a separate bowl, whip the heavy cream until stiff peaks form (about 2-3 minutes).
- Gently fold the whipped cream into the cream cheese mixture, making sure not to deflate it.
- Spoon or pipe the cheesecake filling over the chilled crusts, smoothing the tops.
Step 3: Add the Topping
- Melt the white chocolate in the microwave in 30-second intervals, stirring after each interval until smooth.
- Add a few drops of pink food coloring (or any pastel shade of choice) and stir until evenly colored.
- Spread a thin layer of the melted chocolate over each cheesecake.
Step 4: Decorate & Chill
- Sprinkle each cheesecake with Easter sprinkles and top with mini candy eggs for a festive look.
- Refrigerate for at least 2 hours (or overnight for best results) before serving.
Step 5: Serve & Enjoy!
- Gently remove the cheesecakes from the molds and serve chilled.
Notes
- Use a Silicone Muffin Mold for Easy Removal – This helps the cheesecakes pop out smoothly without sticking.
- Don’t Over-Mix the Whipped Cream – Gently fold it in to keep the cheesecake light and airy.
- Try a Different Crust – Swap graham crackers for chocolate cookies or vanilla wafers for a fun twist!
- Customize the Colors – Use different pastel food colors to create a rainbow effect.
- Make Them Gluten-Free – Use gluten-free graham crackers for a gluten-free version.

