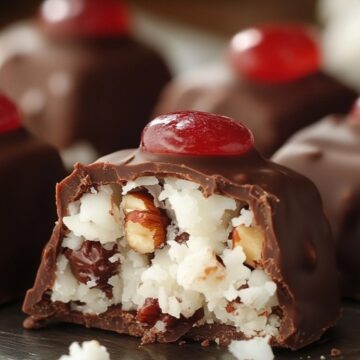
Martha Washington Candy is a timeless, old-fashioned treat that’s rich, creamy, and absolutely irresistible. This recipe has been a part of my family’s holiday traditions for as long as I can remember. My grandmother used to make these every Christmas, packaging them up in little tins to give as gifts. The combination of sweetened coconut, buttery richness, and pecans, all wrapped in a chocolate coating, makes each bite a decadent delight.

These candies are not only nostalgic but also incredibly easy to make. They require minimal ingredients and no baking, which is always a win during the busy holiday season. Whether you’re making them for a holiday platter, a thoughtful gift, or just to indulge your sweet tooth, these bite-sized confections will always hit the sweet spot.
Why You’ll Love This Recipe
- Rich and indulgent: Creamy coconut and pecans coated in smooth chocolate.
- No-bake treat: Perfect for quick and easy preparation.
- Make-ahead friendly: Ideal for holiday gifting or dessert platters.
- Customizable: Choose between semisweet or milk chocolate for coating.
- Family favorite: A recipe steeped in tradition that everyone will love.
Recipe
Ingredients
- 2 cups powdered sugar
- 1 can (14 oz) sweetened condensed milk
- ½ cup unsalted butter, softened
- 2 cups shredded sweetened coconut
- 1 cup chopped pecans
- 12 oz semisweet or milk chocolate chips
- 1 tablespoon coconut oil or shortening (for smoother chocolate coating)
Directions
- Prepare the Candy Filling:
- In a large mixing bowl, combine the powdered sugar, sweetened condensed milk, and softened butter. Mix until smooth and well combined.
- Stir in the shredded coconut and chopped pecans until evenly distributed.
- Shape the Candies:
- Using your hands or a small cookie scoop, roll the mixture into 1-inch balls. Place the balls on a baking sheet lined with parchment paper.
- Freeze the balls for at least 30 minutes to firm up before dipping.
- Melt the Chocolate Coating:
- In a microwave-safe bowl, combine the chocolate chips and coconut oil (or shortening). Microwave in 30-second intervals, stirring after each, until smooth and melted.
- Dip the Candies:
- Using a fork or a toothpick, dip each frozen candy ball into the melted chocolate, ensuring it’s fully coated. Tap off any excess chocolate and place the candy back on the parchment-lined baking sheet.
- Set the Candies:
- Allow the chocolate coating to harden at room temperature or refrigerate the candies for 15-20 minutes until fully set.
- Serve and Enjoy:
- Once the chocolate is firm, transfer the candies to an airtight container for storage or arrange them on a serving platter.
Serving and Storage Tips
- Serving: Serve these candies as a festive dessert, or package them in holiday tins as gifts. They’re a hit on dessert platters or alongside coffee or tea.
- Storage: Store the candies in an airtight container in the refrigerator for up to 2 weeks. For longer storage, freeze them for up to 3 months. Thaw in the fridge before serving.
Helpful Notes
- Toast the pecans lightly before adding them to the filling for a richer, nutty flavor.
- For variety, substitute chopped almonds or walnuts for the pecans.
FAQs
- Can I use dark chocolate instead of semisweet?
Yes! Dark chocolate adds a deeper, less sweet flavor that pairs wonderfully with the coconut filling. - Why do I need to freeze the balls before dipping?
Freezing ensures the balls hold their shape and makes them easier to coat in chocolate without melting. - Can I use unsweetened coconut instead of sweetened?
Yes, but the overall candy will be less sweet. You may want to increase the powdered sugar slightly. - Can I make these candies ahead of time?
Absolutely! These candies store well in the fridge or freezer, making them perfect for preparing ahead of time for holidays or events. - How can I make the chocolate coating extra shiny?
Adding a bit of coconut oil or shortening to the chocolate helps create a smooth and shiny finish.
Final Thoughts
Martha Washington Candy is one of those classic recipes that never goes out of style. Its sweet, nutty filling wrapped in luscious chocolate creates a perfect balance of textures and flavors. Every bite takes me back to those cozy holiday gatherings with family, surrounded by laughter and the smell of festive treats.
This recipe is as easy to make as it is to enjoy, making it a wonderful addition to your holiday traditions. Whether you’re sharing them as gifts or keeping them all to yourself (no judgment!), these candies are sure to become a cherished favorite in your home too. Happy candy-making!
Martha Washington Candy
Ingredients
- 2 cups powdered sugar
- 1 can 14 oz sweetened condensed milk
- ½ cup unsalted butter softened
- 2 cups shredded sweetened coconut
- 1 cup chopped pecans
- 12 oz semisweet or milk chocolate chips
- 1 tablespoon coconut oil or shortening for smoother chocolate coating
Instructions
Prepare the Candy Filling:
- In a large mixing bowl, combine the powdered sugar, sweetened condensed milk, and softened butter. Mix until smooth and well combined.
- Stir in the shredded coconut and chopped pecans until evenly distributed.
Shape the Candies:
- Using your hands or a small cookie scoop, roll the mixture into 1-inch balls. Place the balls on a baking sheet lined with parchment paper.
- Freeze the balls for at least 30 minutes to firm up before dipping.
Melt the Chocolate Coating:
- In a microwave-safe bowl, combine the chocolate chips and coconut oil (or shortening). Microwave in 30-second intervals, stirring after each, until smooth and melted.
Dip the Candies:
- Using a fork or a toothpick, dip each frozen candy ball into the melted chocolate, ensuring it’s fully coated. Tap off any excess chocolate and place the candy back on the parchment-lined baking sheet.
Set the Candies:
- Allow the chocolate coating to harden at room temperature or refrigerate the candies for 15-20 minutes until fully set.
Serve and Enjoy:
- Once the chocolate is firm, transfer the candies to an airtight container for storage or arrange them on a serving platter.
Notes
- Toast the pecans lightly before adding them to the filling for a richer, nutty flavor.
- For variety, substitute chopped almonds or walnuts for the pecans.