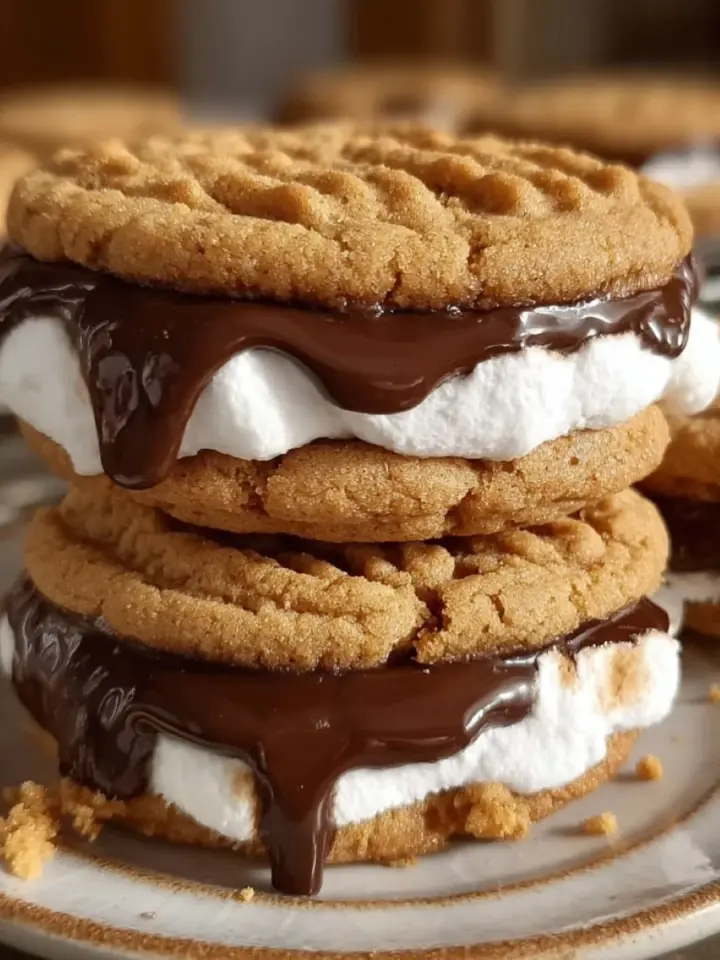
These Peanut Butter S’mores Sandwich Cookies take the classic campfire treat to a whole new level! Imagine soft and chewy peanut butter cookies, sandwiched with gooey marshmallow fluff and rich melted chocolate—each bite is a perfect mix of salty, sweet, and smoky flavors.

With just a few simple ingredients and no flour needed, these cookies are quick to make, gluten-free, and packed with peanut butter goodness. Whether you’re making them for a summer picnic, holiday dessert, or cozy night in, these delicious, melty treats will disappear fast!
Why You’ll Love This Recipe
✔️ Super Easy & Quick – Ready in just 20 minutes!
✔️ No Flour Needed – Naturally gluten-free peanut butter cookies.
✔️ S’mores-Inspired – Classic chocolate, marshmallow, and peanut butter flavors in every bite!
✔️ Perfectly Gooey & Crunchy – Crispy edges, soft center, and a creamy filling.
✔️ Make-Ahead Friendly – Assemble and store them for later!
Recipe
Ingredients
For the Peanut Butter Cookies:
- 1 cup creamy peanut butter
- ½ cup granulated sugar
- ½ cup brown sugar
- 1 egg
- 1 teaspoon vanilla extract
- ½ teaspoon baking soda
- ¼ teaspoon salt
For the S’mores Filling:
- 1 cup chocolate chips, melted
- 1 cup marshmallow fluff
Directions
Step 1: Make the Peanut Butter Cookies
Preheat oven to 350°F (175°C). Line a baking sheet with parchment paper.
In a large bowl, mix peanut butter, granulated sugar, brown sugar, egg, vanilla extract, baking soda, and salt until smooth.
Roll dough into small balls (about 1 tablespoon each) and place them 2 inches apart on the baking sheet.
Flatten each ball with a fork to create a crisscross pattern.
Bake for 8-10 minutes, or until edges are golden brown. The cookies will still be soft but will firm up as they cool.
Let the cookies cool completely before assembling the sandwiches.
Step 2: Assemble the Sandwiches
Melt chocolate chips in the microwave in 30-second intervals, stirring until smooth.
Spread melted chocolate on the bottom of one cookie.
Spread marshmallow fluff on the bottom of another cookie.
Sandwich them together, pressing gently so the marshmallow spreads evenly.
Step 3: Serve & Enjoy!
Let the sandwiches set for 10 minutes before serving.
For an extra toasted flavor, use a kitchen torch or briefly broil the marshmallow fluff for 30 seconds.
Enjoy warm for an ooey-gooey, melty bite!
Serving and Storage Tips
How to Serve:
- Warm for extra gooeyness!
- Pair with a cold glass of milk or hot cocoa.
- Drizzle with extra melted chocolate for an indulgent finish.
How to Store:
- Room Temperature: Store in an airtight container for up to 3 days.
- Refrigerator: Keeps well for up to 1 week—just let them come to room temperature before eating.
- Freezer: Freeze the cookies (without filling) for up to 3 months. Assemble after thawing.
Helpful Notes
- Let Cookies Cool Completely – If they’re too warm, the filling will melt and get messy.
- Use a Kitchen Torch – Toasting the marshmallow fluff gives an authentic s’mores flavor!
- Try Different Chocolate – Use dark chocolate, white chocolate, or Nutella for variety.
- Want More Crunch? – Sprinkle graham cracker crumbs on the chocolate layer.
- Peanut-Free Option – Swap peanut butter for almond or sunflower butter.
FAQs
1. Can I use marshmallows instead of marshmallow fluff?
Yes! Place a marshmallow on one cookie and microwave for 10 seconds, then sandwich with another cookie.
2. Can I use crunchy peanut butter?
Absolutely! It adds extra texture to the cookies.
3. How do I keep the sandwiches from getting too messy?
Let them set for 10 minutes after assembling, or chill them for a firmer texture.
4. Can I make mini versions?
Yes! Roll smaller ½ tablespoon dough balls and bake for 6-8 minutes.
5. How do I prevent my cookies from falling apart?
Since these cookies are flourless, let them cool completely before handling.
Final Thoughts
These Peanut Butter S’mores Sandwich Cookies are everything you love about s’mores, with a rich peanut butter twist! They’re crispy on the edges, soft in the center, and filled with melty chocolate and gooey marshmallow fluff—a perfect balance of salty, sweet, and smoky flavors.
Whether you enjoy them fresh, warm, or chilled, these sandwich cookies are a must-try for peanut butter and s’mores lovers alike. So grab your ingredients and make a batch of these indulgent treats today!
Happy Baking!

Peanut Butter S'mores Sandwich Cookies
Ingredients
For the Peanut Butter Cookies:
- 1 cup creamy peanut butter
- ½ cup granulated sugar
- ½ cup brown sugar
- 1 egg
- 1 teaspoon vanilla extract
- ½ teaspoon baking soda
- ¼ teaspoon salt
For the S’mores Filling:
- 1 cup chocolate chips melted
- 1 cup marshmallow fluff
Instructions
Step 1: Make the Peanut Butter Cookies
- Preheat oven to 350°F (175°C). Line a baking sheet with parchment paper.
- In a large bowl, mix peanut butter, granulated sugar, brown sugar, egg, vanilla extract, baking soda, and salt until smooth.
- Roll dough into small balls (about 1 tablespoon each) and place them 2 inches apart on the baking sheet.
- Flatten each ball with a fork to create a crisscross pattern.
- Bake for 8-10 minutes, or until edges are golden brown. The cookies will still be soft but will firm up as they cool.
- Let the cookies cool completely before assembling the sandwiches.
Step 2: Assemble the Sandwiches
- Melt chocolate chips in the microwave in 30-second intervals, stirring until smooth.
- Spread melted chocolate on the bottom of one cookie.
- Spread marshmallow fluff on the bottom of another cookie.
- Sandwich them together, pressing gently so the marshmallow spreads evenly.
Step 3: Serve & Enjoy!
- Let the sandwiches set for 10 minutes before serving.
- For an extra toasted flavor, use a kitchen torch or briefly broil the marshmallow fluff for 30 seconds.
- Enjoy warm for an ooey-gooey, melty bite!
Notes
- Let Cookies Cool Completely – If they’re too warm, the filling will melt and get messy.
- Use a Kitchen Torch – Toasting the marshmallow fluff gives an authentic s’mores flavor!
- Try Different Chocolate – Use dark chocolate, white chocolate, or Nutella for variety.
- Want More Crunch? – Sprinkle graham cracker crumbs on the chocolate layer.
- Peanut-Free Option – Swap peanut butter for almond or sunflower butter.