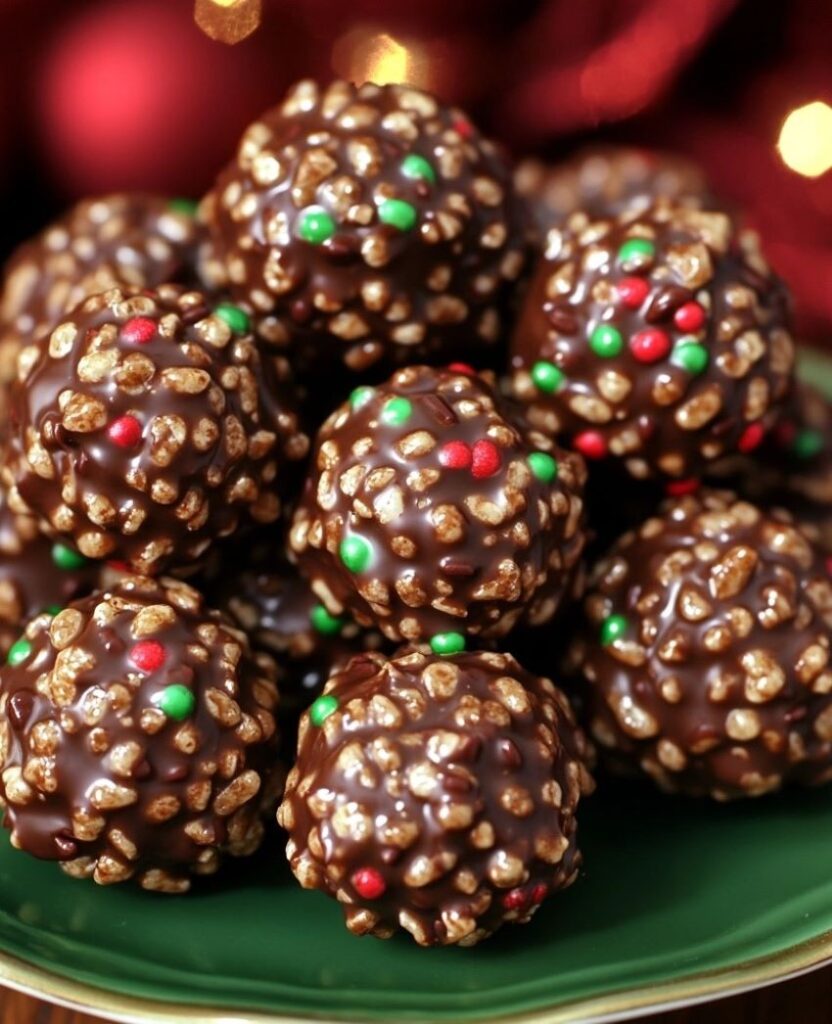
Every Christmas, I find myself drawn to recipes that bring a little extra sparkle to the holiday season. These Christmas Chocolate Rice Krispie Balls are a fun, festive treat that’s perfect for sharing. They combine the crunch of Rice Krispies with the creamy sweetness of peanut butter and chocolate, finished off with a sprinkle of holiday cheer. Whether you’re hosting a gathering or looking for a delicious homemade gift, these no-bake delights are sure to impress. Plus, they’re as fun to make as they are to eat!
Why You’ll Like This Recipe
- Kid-Friendly: Perfect for little helpers in the kitchen, from mixing to sprinkling.
- Quick and Easy: Ready in under 30 minutes with no baking required.
- Festive Look: Holiday sprinkles add a seasonal flair, making them a great addition to any dessert table.
- Customizable: You can adjust the flavors and decorations to suit your preferences.
The Recipe
Ingredients
- 3 cups Rice Krispies cereal
- ½ cup creamy peanut butter
- ½ cup powdered sugar
- ¼ cup unsalted butter, melted
- 1 tsp vanilla extract
- 1 cup semi-sweet or milk chocolate chips
- 1 tbsp coconut oil (optional, for smoother chocolate)
- Holiday sprinkles (red, green, white, or mixed)
Step-by-Step Instructions
- Prepare the Peanut Butter Mixture:
In a large mixing bowl, combine the peanut butter, powdered sugar, melted butter, and vanilla extract. Mix until smooth and well-combined. - Add Rice Krispies:
Gradually fold in the Rice Krispies cereal. Stir gently to coat the cereal evenly without crushing it. - Shape the Balls:
Using your hands, form small balls (about 1-2 inches in diameter) from the mixture. Place them on a baking sheet lined with parchment paper. Chill in the refrigerator for 15-20 minutes to firm up. - Melt the Chocolate:
In a microwave-safe bowl, combine the chocolate chips and coconut oil (if using). Microwave in 20-second intervals, stirring after each, until the chocolate is fully melted and smooth. - Dip the Balls in Chocolate:
Using a fork or dipping tool, coat each chilled ball in the melted chocolate. Allow any excess to drip off before placing it back on the parchment paper. - Decorate:
While the chocolate is still wet, sprinkle the balls with holiday sprinkles. Work quickly, as the chocolate will harden as it cools. - Set the Chocolate:
Return the decorated balls to the refrigerator for another 15 minutes, or until the chocolate is firm.
Serving and Storage Tips
- Serving:
Arrange the Rice Krispie balls on a festive holiday platter or place them in decorative paper liners for a polished presentation. - Storage:
Store in an airtight container in the refrigerator for up to a week. For longer storage, freeze in a sealed container for up to a month. Thaw at room temperature before serving.
Helpful Notes
- Substitutions:
Swap peanut butter for almond butter or sunflower seed butter for a nut-free version. Use dark chocolate instead of milk chocolate for a richer flavor. - Coconut Oil:
Adding coconut oil to the melted chocolate ensures a smoother coating, but it’s optional if you prefer a thicker chocolate layer. - Shaping Tips:
Lightly grease your hands with butter or cooking spray to prevent sticking while shaping the balls. - Decorating Options:
Try crushed candy canes, white chocolate drizzle, or edible glitter for additional holiday flair.
FAQs
- Can I make these nut-free?
Yes, substitute peanut butter with sunflower seed butter or a similar nut-free alternative. Ensure all other ingredients are nut-free. - What if I don’t have powdered sugar?
You can make your own powdered sugar by blending granulated sugar in a food processor until fine. However, the texture may vary slightly. - How do I prevent the chocolate from clumping?
Melt the chocolate slowly in short intervals and stir frequently. Adding coconut oil can also help achieve a smoother consistency. - Can I use a different cereal?
Yes! While Rice Krispies are traditional, puffed rice or even cornflakes can work as substitutes for a unique twist. - How far in advance can I make these?
These treats can be made up to a week in advance if stored in an airtight container in the refrigerator.
Final Thoughts
Christmas Chocolate Rice Krispie Balls are a delightful way to add some holiday cheer to your dessert lineup. They’re easy to make, fun to customize, and always a hit with family and friends. Whether you’re creating a dessert platter or gifting them in festive boxes, these sweet and crunchy treats will brighten anyone’s day. Make a batch this season, and watch the smiles light up around you!

Christmas Chocolate Rice Krispie Balls
Ingredients
- 3 cups Rice Krispies cereal
- ½ cup creamy peanut butter
- ½ cup powdered sugar
- ¼ cup unsalted butter melted
- 1 teaspoon vanilla extract
- 1 cup semi-sweet or milk chocolate chips
- 1 tablespoon coconut oil optional, for smoother chocolate
- Holiday sprinkles red, green, white, or mixed
Instructions
Prepare the Peanut Butter Mixture:
- In a large mixing bowl, combine the peanut butter, powdered sugar, melted butter, and vanilla extract. Mix until smooth and well-combined.
Add Rice Krispies:
- Gradually fold in the Rice Krispies cereal. Stir gently to coat the cereal evenly without crushing it.
Shape the Balls:
- Using your hands, form small balls (about 1-2 inches in diameter) from the mixture. Place them on a baking sheet lined with parchment paper. Chill in the refrigerator for 15-20 minutes to firm up.
Melt the Chocolate:
- In a microwave-safe bowl, combine the chocolate chips and coconut oil (if using). Microwave in 20-second intervals, stirring after each, until the chocolate is fully melted and smooth.
Dip the Balls in Chocolate:
- Using a fork or dipping tool, coat each chilled ball in the melted chocolate. Allow any excess to drip off before placing it back on the parchment paper.
Decorate:
- While the chocolate is still wet, sprinkle the balls with holiday sprinkles. Work quickly, as the chocolate will harden as it cools.
Set the Chocolate:
- Return the decorated balls to the refrigerator for another 15 minutes, or until the chocolate is firm.
Notes
-
Substitutions:
Swap peanut butter for almond butter or sunflower seed butter for a nut-free version. Use dark chocolate instead of milk chocolate for a richer flavor. -
Coconut Oil:
Adding coconut oil to the melted chocolate ensures a smoother coating, but it’s optional if you prefer a thicker chocolate layer. -
Shaping Tips:
Lightly grease your hands with butter or cooking spray to prevent sticking while shaping the balls.

